Announcing Seabass 1.0: Your DJ Toolbox

I’ve been DJing a lot lately, and as it happens, I like Denon DJ hardware. Most commonly, you will find gear made by Pioneer (AlphaTeta) though, and switching between mixers and their eco-systems is quite a pain. Pioneer has properly locked down the market, while Denon, in my opinion, offers way more value for money, and just nicer hardware. Out of frustration when moving from my home setup to mixers elsewhere, I figured, why not just write a small commandline tool that syncs the cue points that I’ve created on my Denon mixer to the Pioneer library on the same USB stick. Should be easy, right? Ow, sebas, you sweet summer child…

Now at work, we use AI tools to help us write code and it makes me quite a bit more productive as a programmer. While I understand (and even agree to) some of the criticisms that exist around the use of AI in the Free Software I think that AI is there to stay, and that, if used well, can make our lives as (Free) software developers a lot easier. KDE’s contributor guidelines allow the use of AI and give clear guidelines about what is OK and what is not. There have of course been discussions in the community around AI, but those are mostly about AI-aided contributions to existing software, not so much an existing KDE developer using AI tools to develop a new application. Nobody wants AI slop and we should be careful and thoughtful about how we use AI in our work and interactions. So far, my experience has been rather good. I have tried to be thoughtful at all times, and acknowledged that everything I do (with AI or not) is my responsibility. Being mindful about others is very important. Not just in this context, of course.

So in the past months I put together a new tool, called Seabass. I’ve shown an initial version to some of my DJ friends and got a lot of good input and direction, as well as support and of course testing, as well as a few suggestions for things that would make really valuable additions. There is a fair amount of frustration around, especially, but not limited to Rekordbox, the software created and sold by Pioneer/AlphaTeta alongside their hardware offerings, and frankly, there’s a lot to be improved as well. (Honestly, reading the rekordbox subreddit makes you think of Stockholm syndrome more often than “what a cool hobby!”.)
Seabass has already become a very valuable tool for me. I can now DJ at home all I want, prep my sets and then take my USB stick elsewhere, plug in and play. I have asked my friend Nuno Pinheiro to make an icon for Seabass, and not only did he agree, he blew me away with our very cool Seabass mascot. Thank you so much, dude!

Seabass allows me to explore, sync, back up and maintain my music collection more easily. Not at least, I can finally use my precious Linux for my DJ hobby! Seabass provides powerful tools that make your library more transparent and provide greater control over it. Next to its library management tools, it also provides a benchmarking tool, measures and tells you when your USB stick is dying, allows you to quickly transfer things, to either your harddisk or another stick. All incremental, all designed to be as bullet-proof and forgiving as possible.
The scope, as it happens, has shifted somewhat. I’ve slowly been adding creative features to Seabass as well, and the effect on my sets has been noticed.
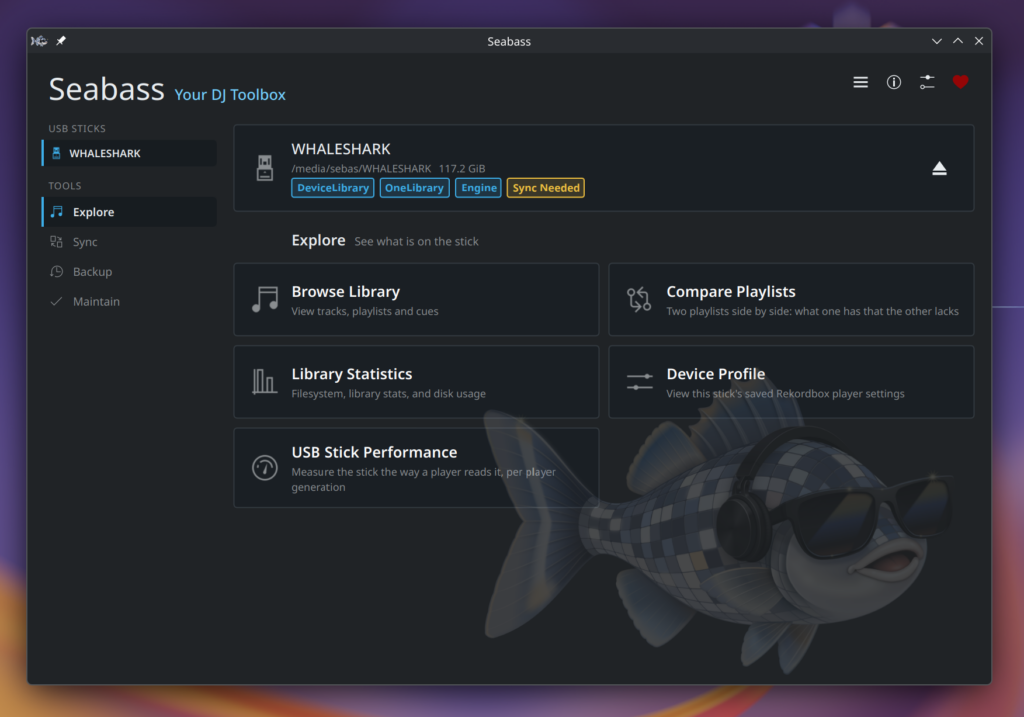

So, today, we present Seabass 1.0. Your DJ Toolbox. I want this to be the creative and open space, as well as the tools that make many DJ’s lives easier, less frustrating, more fun and of course, more Free.

As it stands, youstill need rekordbox to import and analyze the music. The algorithms that analyze the music to produce the waveform and beatgrid data is not something I can emulate or replace, at least not at the expected quality (yet?), so for now, you still have to use rekordbox to import your music.
My living room now has 4 DJ mixers of different sorts (for testing), and it’s been quite some fun reverse-engineering the peculiarities of an XDJ-RX2 (running an embedded version of rekordbox, btw), making sure cue points land on the exact spot they should, taking into account mp3 encoders used for a given track, very interesting ways these machines use to read and save their user’s inputs. If you’re into rabbit holes, come and get some!

Seabass runs on Linux, Mac and Windows. For Mac, there are now universal binaries, which means: pretty much any computer made in the past ten years should be able to run Seabass. KDE’s cool Craft project alongside KDE’s pretty awesome CI infrastructure provides the legwork for this. A big thanks to the KDE team, and especially Ben Cooksley for helping me get this done!

Seabass itself is structured in layers, there’s a commandline tool called seabass-cli which makes it a lot more transparant to see what’s going on under the hood. Unittest coverage is at a decent 80+%, with the remainder taken care of by a suite of end to end tests that I run on all three target platforms., plus a ui test suite that exercises and checks most of the QtQuick code. There’s a feature for users to submit an anonymized version of their library, which can be added to the testing suite.
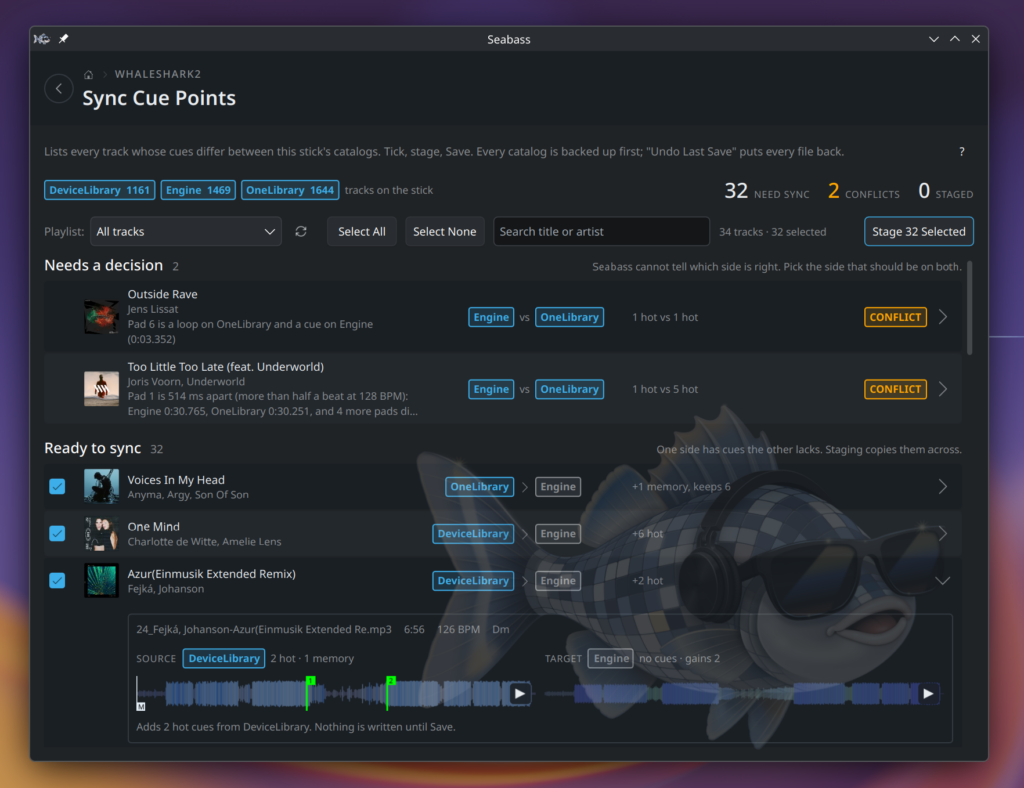
Seabass acts on, and keeps 3 database formats in sync. Pioneer’s DeviceLibrary, Pioneer’s OneLibrary format (yes, two…) and Denon’s Engine format. While developing Seabass, a fair amount of reverse engineering had to be done. I’ve upstreamed a bunch of patches to especially libdjinterop.

Since Seabass is about music, you can also use it to listen to your tracks and playlists. The beatgrid and waveform data that has been to the track actually makes a wonderful base for cool animations. Let’s just say I did have some fun with OpenGL shaders, manifested in the play animation (which can be made full screen).

I haven’t done a lot of Free Software work in my free time in a while, but with this, I’ve found back some of the energy and a new project to dig in to. And it’s good to be back!

KDE Documentary

For more than 20 years, I’ve been part of the KDE community, one of the largest and most impactful Free and Open Source software community world-wide. Yesterday, KDE turned 30 and this went accompanied with the premiere of the KDE documentary.
As former release manager, Plasma core developer and KDE e.V. board member, I’ve also been interviewed. A fairly prominent NPC role went out to Skippie, my cat.

Lately, I have been back into Free Software development, working on two apps that are closely related to hobbies of mine. Watch this space for news! Something nice has been cooking!

Whaleshark opens Knopje

On 19th of June, I will open the next edition of Knopje with a 1.5h set of melodic techno. The event starts at 23:00 at GAS19 in Nijmegen. Of course, my friend Roi Koch will also play a set, alongside a number of other fine DJs. Get yourself a ticket.

Sound-reactive Sideboard

Sound-reactive sideboard

A project that I had planned for quite some time came to fruition last year, now I finally found time to document the result. My livingroom sideboard looked messy and kind of boring while not blending in anymore with the updated style of my living room. I wanted to turn it into a striking centerpiece of the room.
The plan was to install a sound-reactive lighting system. I wanted the light effects to be detailed and not disturbed by ambient sound in the living room, i.e. it sound not react to people’s voices, just the music playing.

My living room sideboard is an off-the-shelf product from IKEA that I bought many years ago. It didn’t have doors installed, but I was delighted that I could still buy matching doors with windows in them.
To realize the light effects, I’ve installed frosted plexi glass inside the windows.

Getting technical…

To control the LEDs, I’m using an ESP32-based LED controller with a line-in module and an ADC (analog-digital converter). After some experimenting, I’ve found this board to work well. I’ve connected 6 WS2812B LED strips to 3 pins and installed them with an aluminium profile into the doors. The frosted windows and profiles diffuse the light nicely so you can’t make out individual LEDs really.
On the software side, I’m using a sound-reactive port of the WLED project. WLED is Free and Open Source software, of course. Though its user interface can be a little unwieldy, it’s also very powerful and integrates nicely with homeassistant, so it can be controlled automatically.

Inside view
Inside view

The ESP32, being a rather powerful dual-core microcontroller, can process the incoming audio signal on one core (using fast-fourier transformation) and compute complex LED effects on the other core. Rendering up to 200 frames per second to 2 times 210 LEDs is no problem while power consumption of just the controller stays well under 1W. Pretty impressive! Depending on the LED effects (number of LEDs lit up at a given time and their colors), the whole thing hardly ever reaches 10W of power consumption.

ESP32-based LED controller

Another functional goal of this project was to solve cooling issues of my amplifier once and for all. The amp would run really hot and shut off after playing at higher volume for some time. I installed a bunch of 12cm fans which suck air through the amplifier and blow it out on the backside. Both amp and and fans are connected to smartplugs. I turned to my homeassistant and set up an automation which turns the fans on whenever the amp’s power consumption reaches a certain level. This works really nicely, since the fans never spin at lower volumes (when you could hear them through the music) and keep everything cool and running stable at higher volume when it’s necessary — without human interaction.

Cooling system
Cooling system

Walnut finish

The outer shell of the sideboard is made of walnut wooden panels with an oil and varnish finish, thanks to my friend Joris. The oil gives it a darker look and accentuates the grain, matching the speaker system. The matte varnish finish (Skylt, highly recommended for its durability and natural look) allows me to sleep well even if people put their drinks on it.

Done and dusted
Done and dusted

I love it when a plan comes together!

I’m really happy with the result. While I had thought it out for a long time already, it’s always a lot more impressive when you see the final result in action.
The WLED firmware allows me to create interesting light effects. I can run the 3 doors as one, but also easily split them up into segments so each door panel renders its own effect. WLED has ca. 200 different LED effects, many of them react to sound. Each effect can be combined with one of 50 color palettes, some of the palettes are sound-reactive in their own right leading to a very dynamic display.
One cool feature is that the processed sound data can be broadcast across the network (over UDP) and received by other WLED controllers, so I can have multiple LED displays in the house, each rendering their own effect to the music, creating a more immersive experience.


More mobile settings: keyboard & wired network

Recently, I’ve worked on making certain “less obvious” system settings more accessible for Plasma Mobile users. The modules I’ve worked on fall just outside the typical mobile phone use-case, but can be important to users of other types of devices. Specifically, users that plug in or connect a keyboard once in a while and need to change its layout or language, or devices that are connected using an ethernet cable, as often is the case with embedded industrial devices.

Mobile keyboard settings
Wired network settings

These two settings module offer a subset of their “desktop companions'” settings and cater to simpler use-cases while sporting a leaner and more focused user interface. Most of the business logic and the more complex UI components are also shared with the desktop versions.

Reviewers needed!

The merge requests for both are currently under review and I’d appreciate if people could help ironing out issues so we can go ahead and merge the code:

Update: Both modules have been merged and will ship as part of Plasma 6.6.

Home-made Berliner Currywurst

Alhoewel ik een paar weken geleden, na meer dan 27 jaar in Nederland te wonen mijn Duits paspoort heb ingeleverd, zijn er toch een paar dingen uit de Duitse cultuur die een plaats mijn hart zullen blijven hebben (naast lange zinnen met comma’s). Een daarvan is het toppunt van Duitse fast-food menu’s (naast Döner Kebab), good old Currywurst.

Currywurst
Currywurst

Het recept (in het Duits, uiteraard) vind je hier. Tip: voeg een heel klein beetje chilipoeder toe voor wat extra pit. Dat mag van mij wel.

Tomato and burrata pasta with basil Parmesan

Tomato and burrata pasta with basil Parmesan
Dinner is ready.

End of summmer means home-grown tomatoes. Credits for this luscious Italian recipe from foodblogger Notorious Foodie. For full recipe see below. Their presentation beats mine, of course (make sure to turn the music on as well!).

  1. Slice in half ~400g of sweet, plump tomatoes – any small variety you like, datterini, piccolo, cherry – I used piccolo here
  2. In a med-heat pan, add 4tbsp EV olive oil, followed by 3 cloves garlic, half a shallot, 1 peperoncino / red chilli – fry ~4 mins till oil is infused and fragrant
  3. Add in tomatoes and season with sea salt + black pepp and basil – allow to cook for 15-20 mins, lid on – careful heat isn’t too high, you want a gentle simmer
  4. Remove lid and deglaze with a 200ml white wine – I used this Soave Classico from Inama Vigneti
  5. Allow to reduce for further 10 mins – you should see the tomato skins loosen and fall off – at this point, remove as many skins as poss + the garlic, basil, shallot and peperoncino, they’ve done their work
  6. Remove from heat and add sauce to pot along with 1 whole burrata
  7. Add 2tbsp olive oil and blitz together till smooth and creamy – taste and adjust for seasoning
  8. Add spaghetti to salted boiling water and add sauce back into the pan to heat up
  9. Throw your al dente pasta into the sauce along with some pasta water and continue melding together till perfectly cooked – once almost done, kill heat, add in some grated parmigiano and combine
  10. Basil Parmesan: add 75g cold parmigiano + a handful of basil leaves to a food processor and blitz till crumbly and bright green – this stuff is amazing
  11. Plate up, spooning over more of the tomato burrata sauce and sprinkling over your basil parm

Back in Action on Plasma (Mobile)

After I took a longer break from KDE development, I’ve been back in action for a few months now. It’s really nice to be back among friends, hacking on what I like most: Plasma. My focus has been on Plasma Mobile with some work naturally bleeding over into other areas.

Plasma on more Devices

I’d like to share some bits and pieces that I’ve worked on in the past months. Most of my efforts have revolved around making Plasma Mobile suitable for a wider range of devices and use-cases. The purpose of this work is that I want to make Plasma Mobile a more viable base for all kinds of products, not just mobile phones. We have a really mature software stack and great tools and applications which make it relatively easy for companies to create amazing products without having to hire large teams and many years to get the product ready for their market. This is I think a very interesting and worthwhile niche for Plasma to get into and I’m sure that Valve is not the only company that understands this.

Convergence Improvements

Convergence, or rather being able to support and switch between formfactors and usage patterns has always been a pet-peeve of mine and still is.
One area was improving using the available screen real estate use landscape displays (Plasma Mobile has quite naturally been rather “portrait-focused”, though a few smaller patches go a long way.)

Configurable number of columns in the Quicksettings drawer

I also improve usability with different pixel densities in the mobile shell by making the size of the top panel configurable. Also, when plugging in a second monitor, Plasma Mobile now switches from “all apps are maximized” to normal window management. (I’m currently working on KWin supporting more fine-grained window management. Currently, we just maximize all windows which has problems especially with modal dialogs.)

One changeset I worked on earlier this year makes it possible to ship multiple user interfaces for settings modules (“kcms”). An example is the “remote desktop” kcm which now shows a mobile-focused UI in Plasma Mobile. What happens here is that we load a main_phone.qml file in Plasma Mobile (where “phone” is picked from a list of form factors set in the environment of the session, so basically the “main” QML file gets picked based on the device. This mechanism allows us to share components quite easily, reducing the delta between different device UIs.

Mobile and Desktop RDP settings

This actually builds on top of work that I’ve done ten years ago which added support for form factors to our plugin metadata system.
I’ve also made the “Display & Monitor” kcm usable on mobile, this is a pretty important thing to have working when you want to be able to plug in an external monitor into your device. I have a mobile version of the keyboard KCM in the pipeline, too, but this will need a bit more work before it’s ready for prime-time.

More Features

There’s a new page in the mobile Wi-fi settings module, showing connection details and tranfer speeds. The code for this was amazingly simple since I could lift most of the functionality from the desktop panel widget. A shared code-base across devices really speeds up development.

Connection details for the mobile wifi settings

Adding useful features here and there, such as having the list of available bluetooth devices now filtered by default and only showing devices which actually make sense to pair (with an option to “Show all devices” in good Plasma manner). This feature isn’t mobile-specific, so desktop and laptop users will benefit.

Welcome to Okular Mobile

Not all my work goes into infrastructural and “shell” bits. The mobile okular version has now kind of caught up with the desktop version since it got a nice welcome screen when opened. This allows the user to easily open a document either from the “Documents” directory on disk (this is actually configurable) or one of the recent files viewed.

Okular Mobile Welcome Screen

Going to Akademy ’25

After having missed our yearly world conference for a number of years, this year I will be at Akademy again. I’m really looking forward to seeing everybody in person again!

I’m going to Akademy!

See you in Berlin!